
William Henry Insider

How to Smoke a Cigar Properly
By William Henry
November 30, 2023
The world of premium cigars is not merely about smoking; it's about indulging in a holistic experience. The joy of cigar smoking extends beyond the aroma and flavor of a finely rolled cigar; it involves the anticipation of choosing your smoke, the artistry of lighting it, and the finesse of executing the perfect cut. Discovering your personal preferences in each of these aspects is a journey of self-discovery and part of the enthralling charm of this sophisticated pastime.
The Art of Cutting a Cigar
Learning to cut a cigar correctly and comfortably is an art that takes time to master. A cigar is not just an object; it's a testament to the craftsmanship that goes into rolling each piece by hand. Anyone can haphazardly chop off the end of a cigar and begin smoking. However, the true connoisseur takes a moment to admire the craftsmanship, identify the cap with a discerning eye, and remove it confidently. This small act of ceremony transforms the experience into something far more profound and enjoyable.
The cigar cutter you choose plays a significant role in this process. It's not unusual to see friends gathering around a new cutter in the lounge, eagerly discussing its features and sharing their experiences. Each cutter has its unique charm, and choosing the right one enhances the cigar cutting and smoking experience, making it a cherished ritual rather than a hurried act.
The Pleasure of Slowing Down
Cigars offer an escape from the relentless pace of daily life. They represent a moment of leisure, an opportunity to savor not just the flavor of a fine cigar but also the ambiance of the environment you've chosen for your smoke. This can be a quiet corner of your home, a bustling cigar lounge, or an outdoor space that offers a scenic view.
The joy of smoking a cigar often comes with the company you keep. Sometimes, it's the comfort of close friends, exchanging tales and laughter that only intimate camaraderie can foster. At other times, it's the thrill of sparking a conversation with a stranger at a lounge, finding common ground over an interesting smoke or a unique smoking implement.
The Objects That Tell a Story
The beauty of cigar smoking lies in the stories that are woven around it. The objects associated with this ritual—the cigar itself, the cutter, the lighter, the ashtray—carry their own inherent narratives. Crafted with care and used with reverence, these objects not only tell the story of their creation but also become a part of your personal journey.
Consider our cigar cutters, for instance. Each piece tells a tale of rarity and uniqueness, of an edge that's sharper than others. They speak of the individual who uses them, of their choices and tastes, adding another layer to their personal story. As you use these tools and savor your cigar, you're not just enjoying a smoke. You're creating memories, establishing traditions, and crafting your own unique narrative.
Enjoy Your Time, Craft Your Story
The joy of cigar smoking is about more than the physical act. It's about the stories you tell, the memories you make, and the experiences you share. So, as you choose your smoke, light it up, and make that perfect cut, remember to savor the moment. Relish the environment, enjoy the company, and take pleasure in the journey.
Whether you're a seasoned cigar aficionado or a newcomer to this elegant pastime, the world of cigars invites you to explore, discover, and enjoy. Take your time, immerse yourself in the experience, and most importantly, craft your story. Cigar smoking isn't just a hobby; it's a lifestyle—one that epitomizes sophistication, elegance, and a zest for life.
Navigating the Nuances of Cigar Smoking
One of the many subtleties involved in the world of cigars is the art of cutting. The end of the cigar's wrapper that you cut, called the cap, is sealed with a piece of tobacco leaf to keep the wrapper from unwrapping. If cut excessively, the wrapper can begin to unravel, leading to a less-than-enjoyable smoking experience. Over-cutting can also create an overly loose draw, altering the balance of air and smoke, which can distort the flavors and cause the cigar to burn too hot.
The key is to cut just enough to allow for a comfortable draw while preserving the structure of the cigar. This usually means cutting about one-sixteenth to one-eighth of an inch from the cap. As you gain experience, you'll learn to make the perfect cut intuitively, enhancing the overall experience.
As for how to smoke the cigar, it's an elegant symphony of steps designed to maximize your enjoyment. Start by holding the cigar up to your mouth and drawing in gently. Remember, unlike cigarettes, you don't inhale the smoke from a cigar. Instead, you let the smoke linger in your mouth, savoring the rich, complex flavors. The goal here is to appreciate the full-bodied taste and the aroma of the smoke.
Take your time between puffs, allowing the cigar to cool and thus preserving its flavors. A good rule of thumb is to aim for about one puff per minute. This leisurely pace contributes to the relaxation and contemplation often associated with the ritual of cigar smoking.
But what happens if, despite all these carefully orchestrated steps, you find that you're not enjoying the experience? First and foremost, remember that the world of cigars is vast and varied, with a multitude of flavors, strengths, and sizes. Just like with any other indulgence, it may take some time and experimentation to find the right cigar that suits your palate.
Don't be afraid to try different brands, shapes, and sizes. Each cigar has a unique personality, and part of the allure is in exploring these endless possibilities. If a particular cigar isn't to your liking, it's perfectly acceptable to put it out. Cigar smoking is meant to be a pleasurable experience, and there's no reason to persist if you're not enjoying it. Simply set the cigar down in the ashtray and let it extinguish naturally.
In the end, remember that the art of cigar smoking is a personal journey. It's about savoring moments of tranquility, immersing yourself in a rich tradition, and appreciating the craftsmanship that goes into every cigar. Whether you're a seasoned connoisseur or a curious novice, the world of cigars offers a captivating experience, steeped in tradition and brimming with sophistication.
Delving Deeper into the World of Cigars: Nuances to Consider
When embarking on the captivating journey of cigar smoking, there are several nuances you may want to consider. These can range from understanding cigar sizes, shapes, and wrappers, to learning how to store cigars properly. Let's explore some of these aspects for cigar smokers in more detail.
Cigar Sizes and Shapes: Cigars come in various sizes and shapes, commonly referred to as vitolas. These can significantly impact the smoking experience, as they affect the burn rate and draw of the cigar. For example, a thicker cigar, known as a robusto, offers a slower burn and a cooler smoke, whereas a thinner, longer cigar, such as a lancero, provides a faster burn and a more concentrated flavor. Understanding the different vitolas can aid in selecting the right cigar for the occasion and your preferred smoking duration.
Cigar Wrappers: The wrapper, or the outermost leaf of a cigar, plays a substantial role in the cigar's flavor profile. Different types of wrappers, such as Connecticut, Habano, or Maduro, each offer unique flavors and complexities. For instance, a Connecticut wrapper is typically lighter and offers a milder flavor, while a Maduro wrapper is darker and can provide richer, sweeter notes.
Pairing with Drinks: The right beverage can elevate your cigar smoking experience, enhancing the flavors and offering a more sophisticated experience. A single malt whisky, a vintage port, or a strong coffee can all be perfect pairings for your chosen cigar, and the discovery of each is an exciting exploration in itself.
Storing Cigars: Maintaining the right humidity and temperature is crucial for preserving the quality of your cigars. A well-kept cigar humidor can ensure your cigars remain fresh, aromatic, and ready to smoke whenever you wish. Knowing how to properly store your cigars can make a significant difference in your overall enjoyment.
Tasting Notes: Developing a refined palate to identify the various tasting notes in a cigar is a fulfilling aspect of the cigar journey. From the initial light (also known as the first third) to the final third, a cigar's flavor profile can change dramatically. Learning to discern these subtle shifts and complexities can enhance your appreciation for the craftsmanship involved in creating a fine cigar.
Etiquette: Finally, there is an element of etiquette associated with cigar smoking, such as not blowing smoke in another person's direction or respecting the smoking rules of the venue you're in. Understanding these unwritten rules can enrich the social aspect of the cigar-smoking experience.
These nuances, among many others, make cigar smoking a unique and endlessly fascinating hobby. It's about more than just lighting up and puffing; it's about savoring an art form that has been perfected over centuries. So, take your time, explore, and enjoy the journey into the enchanting world of cigars.
Cigars are a classic and elegant indulgence, used for celebration and enjoyment since before the 1400s. While it looks simple enough, there is so much tradition involved in smoking cigars that to those unfamiliar, it can appear daunting to get started. Whether you are simply looking to learn more or are trying to avoid embarrassment at your next bachelor party, knowing how to properly smoke a cigar can come in handy.
Choose your Preferred Cigar
If you are about to smoke your first cigar, chances are that it will be one that is gifted to you at one celebratory event or another. This can make for a great memory, though you are left with little choice in terms of the taste or feel of the cigar. If that is not the case, there are a few things to keep in mind when shopping for your first cigar.
As you are just getting started with cigars, it can be hard finding a cigar type or brand that suits your undeveloped palate, and true trial and error can get expensive. If you are not already used to cigarette smoking in general, you will certainly want to start off with a mild cigar. Get some help from the salesperson at the cigar shop of your choice, they will be happy to make recommendations for your first cigar.
Ask for a few mild cigar options, and make sure not to focus on the look. Bring the cigars up to your nose and take a deep breath in, see that the aroma is appealing to you and is not pungent. This comes down to personal preference, but the smell will be a good indicator of the cigar’s flavor. Select a few affordable alternatives, as there is no surefire way to test how much you like a cigar without smoking it.
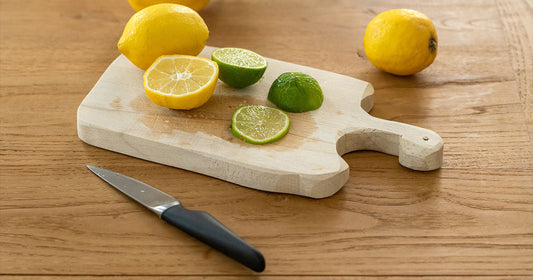
Cut Your Cigar Properly
Before lighting up your first cigar, you will need to make sure that it is properly cut to ensure that it smokes properly. There are many different kinds of cigar cutters, from the classic guillotine style to elegant folding knives with more decorative designs. The style of the cutter itself will likely become a matter of personal preference for you, the most important thing is just that it is sharp enough for a clean cut.
The part of the cigar that you will be cutting off is called the cap, it is the closed-end located at the foot of the cigar. It can be intimidating to cut your first cigar, but if you are nervous, keep in mind that it is always better to cut less. You can always remove more if there is not enough airflow, but you cannot get back whatever you remove.
Using your chosen cutter (a sharp knife will also work in a pinch), remove the cap. The best thing to keep in mind when doing so is that you want to cut the cigar’s rounded end, make sure not to cut far enough down that the end will have parallel sides. If you cut too far, the wrapper leaf may come undone and leave you with a large mess of tobacco. Even if the cigar does not fall apart, you will probably have a rough first smoke, spitting bits of tobacco the entire time.
Let There Be Light
Once you have properly cut the cap off of your cigar, you are ready to light up. Your instinct may be to light the cigar like you would a cigarette, with the flame directly lighting the end of the cigar while you puff lightly. With a quality cigar, you certainly want to avoid doing so, or you will negatively impact the cigar’s flavor and smell.
Holding your lighter just far enough from the cigar that the flame does not reach it, slowly toast the end of your cigar while turning the cigar round. This will slowly light the cigar, far more evenly than it would if you were to hold a torch lighter directly to the end. This will bring out the very best flavors of the cigar without producing as much of a bitter taste.
If you do accidentally torch the cigar more than you intended to, do not despair. While the cigar may not taste or smell as good as it would at its prime, you will still be able to enjoy your experience. Take your time, but it is not so vital that you should feel any anxiety over it.
Smoking Your Cigar
Now that your cigar is toasted and lit, you are finally ready to start smoking. What many cigar smokers will advise is that you actually puff out before taking your first draw. This can clear out some of the chemicals that may have accumulated inside the cigar, pushing out some of the bitter taste. This in turn will give you a more enjoyable first smoke.
Puff gently and draw the smoke into your mouth, letting the flavor spread. Whether you were previously a cigarette smoker or a non-smoker, it is vital to remember to never inhale the smoke from your cigar. Unlike cigarettes, cigars are meant to be slowly enjoyed for their full-bodied taste and scent. Let the smoke sit in your mouth for a few seconds and gently release it. Focus on the flavors and the smells, ignoring everything else if you can.
Aside from the horrible coughing fit that would surely taint your first experience, it is also important not to inhale cigar smoke for health-related reasons. The smoke from a cigar is also much thicker and more potent than that of a cigarette and can lead to a huge increase in smoking-related mortality.
According to the American Cancer Society, cigar smokers can be 4 to 10 times more likely to die from mouth and throat cancers compared to cigarette smokers. That is without even inhaling the smoke, so be sure to stick to puffing to fill your mouth. That is also a great reason to leave the cigar-smoking for special occasions only, or you may find yourself dealing with some nasty health effects.
Enjoy
Now that you have the basics down, try to relax and enjoy yourself. It is good to have an ashtray nearby for obvious reasons, but avoid the instinct to tap off the long ash block at the lit end of your cigar. While it may be satisfying to watch half of the cigar’s length in ash drop into the ashtray, the ash on the end of your cigar will help protect your cigar from overheating or burning too fast.
If the ash does fall, it is not the end of the world, just try not to overdo it for the sake of your own smoking experience. Take your time while smoking, and make sure that you only continue so long as you are still enjoying it.
Do not feel any pressure to finish a cigar, especially if it is your first. For one thing, if you are a non-smoker, the amount of nicotine alone could make you feel sick or nauseous. Even if you have a history of smoking cigarettes, cigar smoke can be overwhelming, and it is of course possible that the particular cigar may simply not be to your taste.
Whether the cigar just is not pleasant, or you are beginning to lose your sense of enjoyment for any reason, that is the perfect time to put it out and complete your experience. Avoid stubbing out the lit end like you would a cigarette, as this can lead to an unpleasant smell in the surrounding area. Set the lit cigar down in the ashtray and let it slowly burn away.
Looking to mark your first cigar smoking adventure or looking for a special something for the aficionado in your life? William Henry has a beautiful selection of Damascus steel cigar cutters with exotic stonework that can make a memorable gift for your favorite cigar smokers.
How to Choose the Perfect Kitchen Knife
By William Henry
April 6, 2023
Whether you truly enjoy spending time in the kitchen and experimenting with new recipes or are just looking to get some of the bare necessities, shopping for new kitchen knives can be a great time. A well-made knife is a beauty to behold and just feels at home in your hand, and you can find great kitchen knives at any price range.
While knives are a bit more straightforward to shop for in comparison to some other home goods, it can be overwhelming when you just do not know what makes a great kitchen knife. There are many knives that are ultimately far more expensive than they are worth, as well as cheaper knives that seem alright, but ultimately need to be replaced more quickly.
This guide will walk you through some basic information about kitchen knives and let you know what to look for when you are buying them.
The Essential Kitchen Knives
While there are many different kinds of knives, some specialized for particular uses, you can still do just about anything you need to in the kitchen with these common options.
The Chef’s Knife
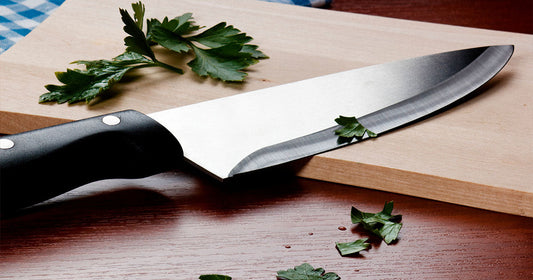
If you could only choose one knife to purchase, a chef’s knife would be your best bet. It can do the job for just about all purposes, and is large and hardy enough to work with heavier foods that might need some extra force to be cut properly. A chef’s knife can work wonders for chopping and mincing vegetables and herbs, slicing meats, breaking down fish and poultry, and practically anything else you might need to do in the kitchen.
The chef’s knife is by far the most versatile, and earned its name for that very reason. These knives often come with a 5 to 10 inch blade, with the longer knives being more balanced. The size you choose to buy ultimately should come down to whatever you are most comfortable with.
The Paring Knife
Also called a utility knife, the paring knife is almost like the little sibling to a chef’s knife. While a chef’s knife can also be used for precise work, these smaller knives with 2 to 4 inch blades are ideal for cutting and mincing smaller vegetables and herbs. Paring knives are also great for trimming larger cuts of meat without as much waste.
The Serrated Knife
While less versatile than the chef’s knife or paring knife, serrated blades play a very important role in the kitchen. While straight and curved-edge knives are great for chopping and slicing harder materials, they can oftentimes crush softer foods like bread loaves or tomatoes. The serrated edge allows you to smoothly cut back and forth without putting direct weight onto the food.
It certainly is not as useful across the board as a chef’s knife, but the serrated blade is more replaceable since they are difficult to sharpen at home. As such, choosing a cheaper option is not a bad choice in this case.
Honorable Mention: The Honing Steel
Not a kitchen knife, but something you are sure to have seen in almost every kitchen is the honing steel. Often incorrectly referred to as knife sharpeners, honing steels are thin metal rods that can be used to correct a blade’s edge when it starts to dull.
Unlike knife sharpeners, which shave away bits of material from the edge of the blade to make a sharp point, honing steels simply press the blade back into the right shape. These are inexpensive, easy to use, and will keep your knives in great shape without having to replace them as often.
The Anatomy of a Knife
Once you know the kind of knife or knives you are looking to buy, it is good to bear in mind the different parts that make up your kitchen knives, and eventually to consider the materials they are made of.
The Tip
With a self-explanatory name, the tip of a knife is the smallest part of the blade’s edge, and includes the point of the blade and first inch or two of the cutting edge. The tip is the best part to use for finer and more precise work like slicing small vegetables thinly. Be aware that as the most narrow part of the blade, the tip is a bit more fragile and could snap or chip when dropped or used to pry open containers or open cans.
The Bolster
The thickest part of the blade is the bolster, at the end of the blade opposite the point and leading into the handle or grip. The weight of this part of the blade makes the knife more balanced and overall easier to use. In general, this is the part of your kitchen knife that you should be gripping onto, placing it between your thumb and forefinger for better control and precision. Holding the knife properly helps to avoid dropping the knife or having it slip, which can lead to injury or damage.
The Edge
The cutting end of the blade from the point to its bolster is the edge. The different length and shape of the edge is usually the biggest indicator of what kind of knife you are dealing with, but for this example we will be describing the edge of a chef’s knife.
The thinner, curved end of the blade, the front half or so including the tip leading up to the point, is called the rocker. This end is used for quicker and finer work. Despite the name, it should be used to rock back and forth, but pushed forward with pressure coming from behind.
The thicker end of the blade is called the heel, and it is ideal for cutting through thicker vegetables or even through bone and cartilage. Due to its heft, you are able to bear down on the bolster with your free palm to push the heel through whatever food you are working with.
The Handle
When looking at blade handles, the ideal design is simply whichever is most comfortable for you to handle and work with regularly. Some may appear aesthetically pleasing, but ultimately be less easy to grip. Knife handles that have grooves shaped in for your fingers are often, counterintuitively, not the best option across a wider array of uses. Generally speaking, wood and metal handles are more popular and reliable, while some plastic or rubber handles can get slippery and tough to control.
The Spine
Opposite of the edge is the spine, the not sharp top of the blade. Many knives, like a chef’s knife, will have a flatter or wider spine so that you can put some weight on it with your free hand. Knives intended for more precise work like a serrated blade or filet knife will usually have thinner spines.
The Tang
The end of the blade that is sealed within the handle is called the tang. Knives with what is called a “full tang” will have this piece of metal (or other material) visible along the edge of the handle, though many are made with the tang entirely hidden.
Forged and Stamped Knives
Another aspect to consider when shopping for your ideal kitchen knife is whether the blade is forged or stamped. The more common preference for professional chefs is a forged knife. As the name suggests, forged knives are made from solid pieces of molten metal, which are molded and beaten into shape. Forged knives tend to be more balanced and durable, though often at a higher price.
Stamped knives are essentially punched out of a sheet of flattened steel, and then sharpened. Stamped knives are considered lower quality and are thinner and more flexible. This is not usually ideal for multi-purpose chef’s knives, but can occasionally be advantageous for fileting or deboning.
Materials Used
One of the most important variables to consider when choosing your kitchen knife is the material it is made of, especially for the blade.
Stainless Steel
The most common by far, stainless steel blades are affordable, rust and corrosion resistant, and are reliable for cooks of all levels. Stainless steel blades are slightly softer than some other alternatives, so they need to be honed or sharpened more often, but their consistent quality has made them a classic for a reason.
Carbon Steel
More popular each year, carbon steel kitchen knives are becoming almost as popular as stainless steel in professional kitchens. The addition of carbon into the steel makes the knife’s blade much harder, helping it to keep a sharp edge for longer than the alternatives. This does come with a direct downside however, as the addition of carbon makes the steel less rust-resistant, though proper care and maintenance can offset this negative.
Ceramic
Another popular blade material is ceramic, as these knives tend to be inexpensive, strong, and lightweight. They are, of course, rust proof, and hold a sharp edge very well. The greater risk here is that they are far more likely to chip and break if not handled properly, but they are a great option for most home cooks.
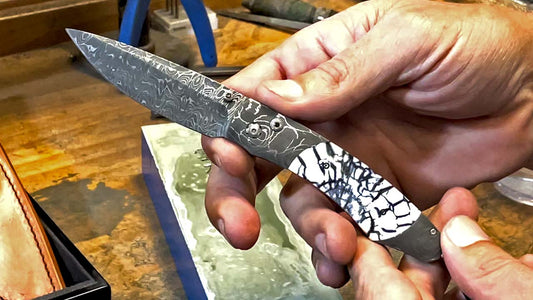
Damascus Steel
Aside from more premium pricing, Damascus steel knives are a great meeting place between the benefits of carbon steel and stainless. With a carbon core placed inside of hand forged steel, these knives are strong, durable, hold a sharp edge very well, and are still more flexible and rust resistant than carbon steel. It can almost go without saying that Damascus steel is just about the most stunning option to look at.
Feel It Out
At the end of the day, the right knife for you is whichever feels right in your hands. Choose a few options based on your budget, materials and the blade types that fit your lifestyle best. Once you have those in mind, pick it up and see if the weight of the knife and contours of the handle suit you and your needs.
William Henry has a stunning selection of Damascus steel chef’s knives and full knife sets to suit your every need, click here to learn more.

Unlocking the Mystique of Labradorite
By William Henry
August 21, 2023
Gemstones have long been prized not only for their beauty but also for their perceived spiritual and healing properties. Among these precious stones, labradorite holds a unique position, its ethereal glow hinting at mysteries waiting to be uncovered. More than just a beautiful adornment, labradorite offers a captivating blend of history, symbolism, and enchanting color that invites exploration.
What Is Labradorite?
Labradorite is a type of feldspar, a group of minerals that make up approximately 60% of the Earth's crust. Named after Labrador, Canada, where it was first discovered in the 18th century, labradorite has since been found in other parts of the world, including Finland, Madagascar, and Ukraine.
What sets labradorite apart from its mineral kin is its striking optical display, known as labradorescence. This phenomenon, caused by internal fractures in the mineral that refract light back and forth, results in a spectacular play of colors. As the viewing angle changes, labradorite can exhibit a range of hues—blue, green, gold, pink, or a mix of these colors, resembling the mesmerizing glow of the Northern Lights.
In its natural state, labradorite appears fairly nondescript, often gray or dark in color. However, when light strikes it at the perfect angle, the stone comes alive with an array of vibrant colors, revealing its hidden beauty. This unique characteristic has made labradorite a popular choice in jewelry making, where it is cut and polished to best display its iridescent qualities.
But labradorite isn’t just a beautiful stone; it's also steeped in lore and symbolism. Various cultures have prized it for its perceived spiritual properties, seeing it as a stone of transformation and protection. It’s often used in meditation and spiritual practices, believed to enhance intuition and consciousness.
Craftsmanship: From Raw Stone to Finished Piece
Crafting a piece of labradorite gemstone jewelry is an art that requires skilled craftsmanship, patience, and a deep understanding of the stone's unique properties. This journey from raw stone to finished piece is an intricate process that transforms labradorite’s rough beauty into a wearable work of art.
Selection of the Stone
The first step in creating a piece of labradorite jewelry involves selecting high-quality raw stones. These are chosen based on their color intensity, clarity, and size. Only labradorite stones that display a vivid play of iridescent colors, a characteristic known as labradorescence, are selected for use in high-quality jewelry.
Cutting and Shaping
Once the labradorite stone has been selected, it is carefully cut and shaped by a skilled lapidary. This is a delicate process, as the angle at which the stone is cut greatly impacts the display of labradorescence. The goal is to maximize the stone's iridescent play of colors. After the stone is cut, it is then polished to a high shine to further enhance its natural beauty.
Designing the Piece
Meanwhile, jewelry designers draft a design for the piece, taking into account the shape, size, and color of the labradorite. Whether it’s a ring, bracelet, pendant, or a pair of cufflinks, each design is thoughtfully created to complement the stone and the wearer's style.
Setting the Stone
Next, the jewelry piece is crafted from metal—gold, silver, or platinum—and the labradorite is carefully set into it. This requires the delicate hand of a seasoned jeweler to ensure that the stone is securely placed while highlighting its best features.
Final Touches
After the labradorite is set, the piece undergoes final touches, which may include additional detailing on the metal, setting of other complementary gemstones, and a final polish to enhance the overall look of the piece.
How to Style Labradorite Jewelry
Labradorite, with its rich, iridescent play of colors and rugged charm, is a perfect gemstone for men's jewelry. Its intriguing color spectrum adds a sophisticated touch to any outfit, whether casual, professional, or formal. Here's how to incorporate labradorite jewelry into your style.
Casual Appeal
For a casual look, a labradorite beaded bracelet can be a stylish addition. It pairs well with watches and leather accessories, adding a unique texture and a pop of color. Consider pairing it with your favorite jeans and a simple t-shirt for an effortless yet stylish look.
Professional Sophistication
In a professional setting, subtlety is key. A labradorite tie pin or cufflinks can add a dash of individuality and intrigue to a classic suit. It's a simple way to incorporate gemstones into your attire without being overly flashy.
Formal Elegance
When it comes to formal events, labradorite gems can elevate your style. A labradorite ring or a tie clip can provide a focal point that draws the eye without overpowering your overall look. Paired with a dark suit, these pieces can truly stand out.
Layering and Combinations
Labradorite pairs beautifully with silver and gold, making it a versatile choice for any piece of jewelry. Try layering different pieces, like a labradorite pendant necklace with a silver chain, or pairing a labradorite bracelet with a classic watch.
Caring for Your Labradorite Jewelry
Caring for your labradorite jewelry is important in order to keep it looking its best. Avoid exposing your stone to harsh chemicals and extreme temperatures. Cleaning should be done with mild soap and water or a soft cloth. Be sure to store it away from direct sunlight and moisture to prevent fading or discoloration.
William Henry's Picks
From luxurious bracelets to stylish cufflinks, William Henry offers a variety of exquisite pieces featuring Labradorite, a gemstone known for its striking iridescence. Here, we share some of our top picks that perfectly encapsulate the allure and mystique of this fascinating gemstone:
Lux: This sterling silver bracelet is adorned with Labradorite, creating a captivating spectrum of colors. Its stainless button lock clasp is set with a spinel gemstone, ensuring both style and durability.
Nimbus: Featuring 'sugar skull' beads in gold and sterling silver, this bracelet is enhanced by the iridescence of Labradorite. Inlaid rubies and an 18k Rose Gold centerpiece add a luxurious touch.
Crescent: This beaded bracelet incorporates sterling silver skulls with iridescent Labradorite beads, making it a true statement piece. It's built on durable, welded aircraft cable for longevity.
Labradorite Shift: A sterling silver pendant showcasing an inlaid Labradorite centerpiece, it mirrors the colors of a dusky sky. Offered on an antique-finish silver chain, it includes an engraving plate for personalization.
Labradorite Pinnacle: Similar to the Shift, this sterling silver pendant presents a Labradorite centerpiece, radiating various hues. It is accompanied by an antique-finish silver chain and offers space for personal engravings.
Labradorite Identity: A polished sterling silver bracelet featuring an inlaid Labradorite centerpiece. Its button lock is inset with a spinel gemstone and includes engraving space on the back for a personalized touch.
Labradorite Retro: This polished sterling silver bracelet is inlaid with Labradorite, reflecting nature's colors. Completed with a spinel-inset button lock, this bracelet combines beauty and durability.
Labradorite Duo: These sterling silver cufflinks showcase Labradorite inlays, reflecting the rich tones of the evening sky. A versatile accessory essential for any gentleman's wardrobe.
Magician: A beaded bracelet made up of a palette of blues and greys, including Labradorite, sodalite, and blue tiger eye. Perfect for any attire, from casual to formal.
Moonlight: This beaded sodalite bracelet features an 18k Rose Gold encased South Sea pearl centerpiece, surrounded by the iridescence of Labradorite beads. Its 18k Rose Gold end caps and clasp complete the piece, paying tribute to nature's grandeur.
Dressing with Distinction
Labradorite is a gemstone that not only captures the eye but also the imagination. Its captivating iridescence and timeless appeal make it a fitting choice for the fine craftsmanship that William Henry is renowned for. Unveil the magic and mystery of labradorite with William Henry's selection of exquisite pieces, each a unique homage to this remarkable stone.
wh-insider: category:Care, Use, & Display
Best Ways to Take Care of Your Kitchen Knives
Best Ways to Take Care of Your Kitchen Knives
By William Henry
September 21, 2022
When it comes to working in the kitchen, the most important tool that home cooks can have is a knife. While it may be tempting to treat your knives as you would a piece of cutlery, that is just about the worst thing you can do for the condition of your blades. Not to worry though, proper care and maintenance of your knives are straightforward and simple.
If you treat your knives well, they will return the favor, and could easily last you a lifetime. Doing this is far from a huge burden, and there are only a few key things to bear in mind.
Sharpening Vs. Honing
There are two standard options when it comes to keeping your blades sharp, honing steel (often incorrectly referred to as sharpening steel) and a knife sharpener. The honing steel is a thin metal rod that, when pushed against the dull blade’s edge at the correct angle, smooths out any little dents and bumps by pressing them back into a straight sharp edge. These come standard with many knife sets and are definitely worth having.
Unlike the honing steel, a knife sharpener does actually shave material away from the blade to create a new, sharp edge. These are often faster and easier to use than a honing steel, which may take some practice to master. That said, since sharpeners do shave down the edges of your knives, they will cause your blades to wear down much faster than a honing steel would.
If you prefer, using a sharpening stone, also called a wet stone, with mineral oil can do wonders for your blades. Keep in mind that this will be a more time-consuming process, however, when compared to sharpeners and honing steels. Using some of this oil alone is also incredibly helpful for your knives, both on the blade and handle. These oils help prevent rust, as well as protect against corrosion that occurs from working with acidic fruits and vegetables.
Whatever method of sharpening you opt to use, maintaining your knife’s edge is perhaps the most vital part of maintaining your kitchen knives. If you keep your knives sharp, the blades will more easily glide through whatever you are cutting. In addition to keeping your knives in good shape, proper and regular sharpening will keep you safer in the long run, since dull blades often require more force and cause a greater risk of slipping and cutting yourself.
If you are not comfortable sharpening your own knives, many knife manufacturers will let you send your knives back for professional sharpening. William Henry offers knife sharpening for any William Henry knives, for only the cost of shipping. Fill out this form and you will have your sharpened knives back in 2-3 weeks.
Use Your Knives Properly
Another great way to keep your knives in proper shape is simply to use the right knives for the right tasks. A kitchen knife is, by its nature, a versatile tool, but using them for the particular tasks they were designed for will keep them looking as sharp as they are.
There are many types of knives, ranging from the standard chef’s knife and paring knife to tools as particular in their intended usage as a tomato knife. That said, the most important thing to keep in mind regarding how to properly use a knife is to use it only for food.
Using your kitchen knives on non-food items will drastically reduce their effectiveness. While it may be easy and convenient to grab a knife to open up packages, cut loose threads, and even as a way to pry open stuck containers, it is not worth it. You will wind up with a much more dull blade, potentially bend or chip the knife, or even have it slip out of your grasp and leave you with a nasty gash.
The next thing to keep in mind would be the kind of edge that your blade has. For example, if you are looking to slice bread, you should always opt for a knife with a serrated edge blade. This will allow you to more easily and safely glide back and forth through the bread. Using a bread knife to chop veggies will not be as effective as you would like, and chances are that the extra force you will apply will have you damaging the sharp blade once you get through to the cutting board.
Another thing to keep in mind is working with foods that require breaking down or cutting through bone. Only a deboning knife and cleavers intended to chop through easily should be used. Using a standard chef’s knife or other nonspecific blades can be dangerous, as well as incredibly damaging for the edges of your knife.
If you are new to working in the kitchen, there is no need to splurge and buy every kind of knife under the sun. That said, you will likely want some standard blade types so that you can easily work with the majority of food items.
Always Use a Cutting Board
It may feel obvious, but always use your knife on a flat surface such as a cutting board. Using your knives on a plate could scratch or chip the plate, as well as lead to slipping and disaster. With so many options commercially available for cutting boards, however, it may be tough to know what to go for.
The best options generally are wood boards, plastic boards, and synthetic rubber boards. Wood boards tend to look the nicest, but the harder surface may require more frequent sharpening. Plastic options will usually be the least expensive and are also better for working with meats and poultry as they can be sanitized in the dishwasher. Synthetic chopping boards will be the easiest on the edge of your blade, and can also provide a better grip against whatever surface you are working on.
Whatever material you decide is best for you, something very important to avoid is scraping food off of the board with your knife. While this is often incredibly convenient, it drastically dulls the edge of your blade, and can even cause it to begin rolling up.
Clean Up
While not as exciting as the other aspects of working with a knife, proper knife maintenance and storage of your knives are important for your safety and the longevity of your blades. Properly washing and storing your knives will help avoid nicks and scratches on the blades, which can be hard to get out when sharpening at home, as well as lead to snagging during use.
Generally, the best practice would be to try washing and drying a knife by hand as soon as you are done using them. This ensures that they spend as little time as possible covered in moisture and dirt. Use a less abrasive sponge and your knife blade will thank you.
Avoid tossing your knife into the kitchen sink and leaving them to bump and scrape against your other dishes. This can be detrimental to their edges and leaves you with a chipped knife, which can be incredibly dangerous to use, not to mention inefficient and frustrating. Not only that, but knives with wooden handles will often absorb a lot of the dirt and bacteria that you can find in the sink.
If possible, you should always avoid washing your knives in a dishwasher. The drastic changes in temperature from hot water and steam, and constant moisture will wear down your blades and leave you with water stains and even rust spots. If you do decide to run your knives through the dishwasher for whatever reason, place them inside securely so that they will not shake and bump into other dishes and kitchen utensils, which will scrape and chip your blades.
Secure Storage
Another way to keep your knives in near-new condition is to store them in a block or, alternatively, attach them to a magnetic strip. Storing your knife loosely in a kitchen drawer like the rest of your cutlery will make them shake around and will certainly have you risking more damage than the alternatives.
Knife blocks help you to store full sets securely and safely and frankly look pretty good on a countertop. If you do not have much counter space or do not have enough knives to warrant a full-sized knife block, a magnetic strip is an easy and convenient place to store a knife or two outside of the drawer.
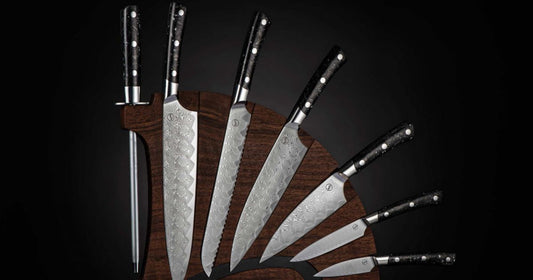
William Henry offers a gorgeous selection of classic knife sets with stunning rare wood and mineral handles, and blades of beautifully crafted Damascus steel. Every set comes with a distinctive and attractive knife block that would look good on any counter, as well as blade covers and a professional leather roll. Take a look today to find the last kitchen knife set you will ever need.

How to Repair a Broken Knife Tip
By William Henry
September 13, 2022
Breaking the tip of your knife can be frustrating, and may leave you contemplating whether you should just toss the knife and get yourself a new one. While it can be a pain to have a chip of your blade fly off after dropping your knife or accidentally hitting a hard surface, it is not the end of the world.
Many higher quality knife manufacturers have easy-to-use and affordable (if not free) knife repair options available to their customers. If your knife does not come with those kinds of repair options, but is still too nice for you to want to part with, you can still repair a chipped tip on your own.
There are a few different methods for repairing a broken knife tip that you can choose from, and they are all fairly simple if you have the patience. Before you get started though, you need to decide how you want to get on the new tip.
Which Side of the Blade to File
This might just come down to a matter of personal preference, but you have the option of deciding which side of the blade to file down to meet the new point of your knife.
If you file down the flat side of the blade down the edge to make the new tip, the belly of the blade will maintain the same curvature as it had before, with the flat side having a steeper curve to it. You can also opt to file down the edge of your blade, giving the belly a new angle, but still providing enough cutting surface.
As long as the work you do with your knife does not depend too strongly on the shape of the blade, either option should do the trick. Your blade will be a little shorter than it was before, but that should not cause you any trouble.
Once you have decided how you plan to repair your chipped knife, you can decide which method suits you and the tools you have at your disposal.
Grit Stone
The most time consuming and physically demanding option is using a grit stone. Grit stones are a traditional and simple way to file down your blade, with lower grit signifying that they remove more material. The user simply grinds their blade at an angle on the stone to shape as they please.
If you are not familiar with different grinding stones but have been in a scout program, you are probably most familiar with a wet stone, which is a grinding stone that you lubricate with water. They are very popular and incredibly effective. Other types of grit stones include oil stones and diamond plates.
While you can argue that the repetitive nature of the task is nearly meditative in a sense, be prepared to spend a few hours on your knife if this is the tool you have available to you. To accomplish this, only two things are crucial, though you will probably want to do some more detailed work afterward. Make sure you have a marker on hand, and a grit stone (preferably one with 400 grit).
Once you have the necessary tools, use the marker to mark the part of the blade you plan to file away. You do not have to be exact as you can always judge by eye while you work, but it is good to set a general boundary to grind down to.
After you have marked the part of the blade you will be removing, hold your knife at about a 45 degree angle against your grit stone and get to work grinding. This will almost definitely take you a few hours, so put on some music or a podcast while you work.
After you have got approximately the tip you were hoping for, your knife is ready to go. If you would like, use a paper towel to wipe the excess sludge off of your grit stone, this can be used to polish your knife!
While this may not leave you with the most professional looking blade, it should more than do the trick in a pinch, and your knife will certainly be able to do everything it could before.
Knife Sharpener
Probably the easiest option, though still requiring a bit of exertion and time on your part, is a knife sharpener. Knife sharpening tools often come with suction cups or clamps attached so that you can securely set them on a flat surface to safely sharpen your knife.
The only tool you need here is the sharpener, and it should be as simple as pulling your knife clean through the device until you are satisfied with your new tip. Be sure to consult any instructions that may have come with your particular knife sharpener in case yours has unique features.
Drill Attachment
If you opt for the process of using a handheld power tool to repair your broken knife, you will need a few things before you get started: A marker of some kind, your handheld drill and attachments (metal cutting blade, grinding and sanding bits), polishing materials, a clamp, and a wet stone or honing steel.
Once you have all of the materials (and your broken knife) get started by using the marker to shade in the part of the blade, top or bottom, that you will be removing to make the new point. Now that everything is planned out and set, clamp the knife to your work table or surface.
Clamping your knife down is crucial, both to ensure that you have proper control over the work surface, and also to avoid any terrible accidents involving flying knives.
Use the metal cutting attachment of your drill to cut off the shaded section of the blade with light and steady pressure while running at full power.
After the chip is gone with the new tip in its place, using the grinding and sanding drill attachments to clean up the cut, polishing afterward. Your knife is now just about ready for use again, all that is left is a little sharpening.
Using a wet stone or honing steel, run the edge of your blade a couple times (on both sides, depending on the knife) until the edge is as sharp as desired.
Belt Sander
Another excellent option for those with tools at their disposal is the belt sander. You will want to start with a medium-grit belt, like a 220 grit. Similar to the other methods, you should try to mark the part of the blade you plan to remove before starting as a baseline. Also make sure you have the sanders leather strop and honing compound.
Before you get started, be aware that the belt grinder will likely cause the knife to heat up rapidly. Both for the safety of your hands and the well-being of your sander, be sure to let your knife cool off as needed. Letting it get too hot can cause you major issues and injuries.
Put the 220 belt onto your sander and set it up depending on your preference, be it horizontal or vertical. Set the sander to its maximum speed, and you are ready to start sharpening your knife back down to a new tip.
Gently move the edge of the blade against the spinning belt, gently pressing the edge into the belt as you run it back and forth, just enough for a dent to form. Do this for a bit before flipping the blade over and evening out the other side of the edge. Make sure to stay focused so you do not go further than you intended.
Once you are satisfied with the new tip of your knife, replace the medium grit belt with the leather strop with the honing compound and move the blade the way you did while sharpening.
How often a blade may need to be sharpened depends on the specific knife manufacturer and materials. For example, William Henry pocket knives are recommended to be sharpened every 18 to 24 months. William Henry will periodically sharpen your knife for just $10 (the cost of shipping it back to you). Just compile the appropriate form here, ship it to us, and we will get it done for you.
How to Sharpen Kitchen Knives
By William Henry
June 10, 2022
When it comes to properly maintaining your kitchen knives and ensuring that they are safe and efficient tools, there is little more important than proper sharpening. There are a number of tried and true methods for sharpening kitchen knives, and the method that suits you will depend on a few different factors.
Before sharpening your knives, you need to consider the type of edge that the blade has, which sharpening tools are most comfortable and convenient to you, and the quality of the blade itself.
Honing Steels
A classic sharpening tool that you can find in any professional kitchen is honing steel. Sometimes incorrectly referred to as a “sharpening steel,” this thin metal rod does not actually sharpen your blades at all. What it instead does is help to realign the edge of the blade of your dull knife by simply pushing the metal into the proper place.
By swiping your blade at about a 15-degree angle on each side with repeated and consistent pressure, the honing steel will help to restructure the edge into the same edge it had previously. Unlike other knife sharpening tools, a properly used honing steel should remove little to none of the actual material of the blade. This makes it one of the best options in terms of maintaining the life of your blade.
Sharpeners
Probably the easiest method for sharpening knives is using a simple knife sharpener. These tools are often ones that you can set on your kitchen counter and are either weighted or include suction cups to avoid slipping, which could be incredibly dangerous.
Unlike honing steel, they do effectively remove material from your blade’s edge. In this process of shaving the edge, they quickly recreate the same “V” shaped edge that your knife had when it was new. While how you use them is fairly similar, those looking for knife sharpeners have two big options to consider: automatic and manual.
Electric Knife Sharpeners
An electric or automatic knife sharpener is easily among the fastest sharpening tools, though it certainly comes at a bigger expense than most of the other manual options. While each electric sharpener comes with its own specific features and proper usage instructions, there are a few things you can expect.
Some automatic sharpeners come with multiple slots for multiple blade edge angles that you can choose from, but at the least, your sharpener should have one slot. If there is only one option on your sharpener, it will likely be for a more standard 15 or 20-degree angle on the blade’s edge.
As you slide the edge of your blade through the slot of an active knife sharpener, abrasive motorized wheels turn on each end of the blade, grinding down the edge as you pull the knife back and forth. This is an extremely fast process, and usually, just a few passes through the sharpener will get your knife to the desired sharpness.
As mentioned previously, electric sharpeners can easily be more expensive than the various manual options for sharpening and honing. It can range up to several hundred dollars for sharpeners with additional grinding slots and coarseness options. It is also important to keep in mind that not all blade edges can be properly corrected by an electric sharpener, so make sure it suits your needs before you splurge.
Manual Knife Sharpeners
Similar both in their simplicity and in how you use them, manual knife sharpeners are another easy method for getting your blade’s edge to the desired angle. As with the electric option, these sharpeners can have a range and variety of abrasive slots for you to choose from. Similarly, the more common ones will most likely have a one or two-step system intended to sharpen your blade to the standard 15 degrees.
Manual sharpeners can occasionally also include grinding wheels that are not motorized, similar to the electric options, but more often have abrasive materials placed in the desired V-shape. The user simply has to draw the blade through the sharpener with even pressure until the desired edge is achieved. This can be more time-consuming than automatic sharpeners, but it is still a very simple process.
While both automatic and manual sharpeners are far faster and easier to use than honing steel might be, at least when it comes to forming consistent angles, these tools do in fact shave metal off of your edge. While in moderation, this is not a big issue, keep in mind that overuse can result in a shorter lifespan and effectiveness for your blades.
Whetstones
Another classic sharpening option, and one of the most versatile for various types of blades, is the whetstone. Whetstones are relatively inexpensive abrasive blocks that, with a little patience and mastery, can sharpen any knife.
Whetstones often come at either one level of grit (or abrasiveness) or with two, one on each side of the block. While these can be used immediately out of the packaging, it is often recommended to dampen your whetstone with either water or honing mineral oils. This helps to reduce friction and makes the process smoother overall. Be sure to check the specific recommendations for your whetstone before use.
After setting the whetstone down in a secure place that it will not slip from, the user simply has to hold the blade facing away from them at a consistent angle, usually 15 or 20 degrees. With consistent and relatively light pressure, the blade then needs to be pressed against the stone in a circular motion. The blade then can be flipped to sharpen the other side.
If your whetstone does have two sides, or if you have multiple whetstones with different grits, start with the coarser options and then work your way to the finer grit. This process definitely takes more patience and time than the other sharpening tools mentioned allow, but you can easily take your whetstone anywhere you go, and with some practice, can definitely get as great an edge as you want.
Sharpening Serrated Edges
Serrated blades, usually meant for slicing bread and some tougher meats, can be a different animal when it comes to sharpening. Since the edge goes up and down in little waves, as opposed to being straight, you cannot treat them exactly as you would your other kitchen knives.
There are some sharpeners intended specifically for serrated edges, though they may not be necessary. If you are careful and patient, some honing steels and sharpeners can still do the trick. While it would be far more difficult to pull through the device, slowly dragging your serrated blade through a knife sharpener, can still get you to the same angle on the edge in a uniform manner. Just mind the bumps.
As these methods can be far more time-consuming, it might be worth looking into the professional sharpening, but you certainly have options.
Testing Your Knife
Once you think your knife seems about sharp enough to the eye, there are a few easy ways to test it out. One of the most fun methods, and one you have certainly seen on TV, is testing your blade’s edge on paper. Simply hold up a sheet of paper and try to pull your blade through it. A well-sharpened knife will be able to cut through cleanly and smoothly. If there is any snagging or crinkling, you have some more work to do.
Another classic method is the nail test, though you certainly need to be more careful when holding a blade toward yourself. Using extreme care, place the edge of your newly sharpened knife to your thumbnail and very lightly press the blade in a perpendicular angle (be sure not to make a slicing motion). A blade that has been sharpened enough should easily shave a small layer of the nail off.
Again, be sure not to use much pressure at all, you are not at all trying to slice when using this method.
Storage
Even the best knives lose their edges in time, and while sharpening is best when following the knife manufacturer’s instructions, it is also crucial to store your blades properly between uses. The best thing you can do for your knives is to not store them in your kitchen drawer. The many pieces of metal bump and scrape into one another, wearing them down much faster than they should.
The most common option is most likely the knife block. These often come with sets of knives specific to them, but can also be sold for universal use. These blocks either have slits for you to store your knives in securely or occasionally can be magnetized to hold any blade shape. Knife blocks are not only very convenient when it comes to grabbing the knife you need quickly, they look great on the counter.
Even if not part of a knife block, magnetic strips can be a great way to keep your knife sharp when you are storing it. These strips can be placed wherever you would prefer your knives to be stored, and all you need to do is stick the blade to the strip when you are finished using it.
One thing to keep in mind is ensuring that your blade is always clean and dry before storing. Trapping moisture between your blade and the magnetic strip or in the slits of your knife block can sometimes build up rust, and can certainly cause major damage to your blade.
The proper method and consistency for sharpening your knife will largely depend on the manufacturer and materials. For example, William Henry kitchen knives are recommended to be sharpened every 18 to 24 months. William Henry will periodically sharpen your knife for just $10 (the cost of shipping it back to you). Just fill out the order form here, ship it to us, and we will get them sharpened for you.
How to sharpen your knife with a wet stone
By Matt Conable
November 21, 2021
https://youtu.be/QtP6PRh1N-k
WH founder Matt Conable demonstrates the technique to sharpen your knives using a Japanese wet stone.
12 Pocket Knife Safety Tips and Laws
12 Pocket Knife Safety Tips and Laws
By William Henry
June 22, 2021
Pocket knives are an invaluable tool to have at all times, but they can literally be a double edge-sword in some cases. We all have been warned about running with scissors and the same applies to an exposed pocket knife blade.
It is never too early to learn about proper knife-wielding rules and laws.That is why we have assembled a complete pocket knife safety and law guide so you can legally and safely use your pocket knife when you need it most.
It Is All Fun and Games
While pocket knives can be visually striking and fun to look at, they should not be handled like a toy.
Pocket knives are powerful and sharp tools - you should always approach one with self-awareness and caution.
Knife injuries can occur at any moment, so it is important to learn proper knife handling techniques to avoid getting hurt.
Always respect these safety rules and laws to avoid any serious injury.
Know Your Laws
Laws regarding pocket knives can vary by jurisdiction based on the type of mechanism and blade length. For example, some carry laws prohibit the concealment of knives over limiting blade length.
Generally, most pocket knives are legal. However, they may be prohibited in certain areas such as schools, government buildings, and planes. Always check your state and local laws to confirm these restrictions.
Open Away From Your Face
Pocket knives with a spring-assisted opening mechanism should be opened with the blade facing away from your face.
When opening your pocket knife, you may intuitively look down into the knife as you are doing it, which can put you at a greater risk of cutting yourself.
If you are opening a traditional Swiss army pocket knife, use both hands, one to securely grip both sides and the other to pull out your tool.
Watch Your Fingers When Closing
When closing your knife, do not let your guard down. Injury can also occur if you are not aware of the position of the blade.
Make sure your fingers are not between the blade and the knife handle. Keeping your fingers away will prevent pinching or cutting when closing.
Cut Away From Your Body
As a rule of thumb, always establish a safety circle and cut away from your body.
Use your dominant hand so you have better control of your tool. Ensure you have a firm grip on the handle. In addition, keep an eye on your fingers and the blade to avoid getting cut.
If you have to pass your knife to someone, it is best if it is closed and in its sheath. But, if that is not possible, always hand the knife with the sharp end pointed down so they can grab it by the handle.
Establish a Safety Circle
Establishing a safety circle is your responsibility to protect yourself and those around you. A safety circle, also known as a blood circle, refers to the area within your extended arm and your blade.
When establishing your blood circle, always do so with the blade in the closed position. Extend your arms with the closed pocket knife in front of you. Draw a circle while rotating your body and check your overhead clearance, too. If you can touch someone else, it is not safe.
If someone enters this space, keep the knife closed and tucked away.
Know Your Knife
Pocket knives vary in size, shape, color, pattern, and function. Some are more able to handle tougher jobs while others may be meant for everyday general use.
It is important to determine the type of jobs your pocket knives are built for. Using them for a job they are not able to handle can cause breakage or injury.
Keep a Sharp Knife
It may sound counter-intuitive, but keeping your pocket knife blade sharp is one of the most important safety tips we can give you. OSHA reports that dull blades are the main reason for workplace injuries related to knives.
Here is why:
When using a dull knife blade, you have to exert additional pressure and force to cut through the material. A job that could easily be done with an extra sharp blade now requires more pressure and increases your risk of injury.
If you are forcing the blade down, the knife can slip from your hand and hurt yourself or someone around you. Sharpen your blade regularly to make your job easier and keep yourself safe.
Use Personal Protective Equipment
While most people will not require any cut-resistant gloves to use a pocket knife, they can be a helpful tool if you want to be extra safe. They can help a Cub Scout learn proper pocket knife safety rules to earn their whittling chip.
Store and Maintain Your Pocket Knives
After you are done with your tool, do not just toss it into any old drawer and call it a day. It is important to take care of your pocket knife so it always has its original function and luster.
When storing your pocket knife in a case, make sure that the blade is closed. In addition, make sure you keep your blade clean. A knife that has accumulated dirt and other debris can affect the function of your blade and is a safety risk.
With every use, inspect your tool to determine if it is in proper working order.
Check for cracks, chips, or a dull blade. Check to make sure if any screws need to be tightened or replaced or if any hinges need to be oiled. If you see any irregularity, fix it right away.
Keep Your Knife Dry
Keeping your knife dry may seem like more of a maintenance tip, but it can also increase your risk of injury.
When a pocket knife is wet for an excessive period of time, it can build up rust. If you do not get rid of the rust, your rusted pocket knife can break more easily than one that is not.
Safe Handling for Longevity
In addition, handling a wet pocket knife is a recipe for disaster. It can cause your knife to slip from your hand and injury you or someone around you.
Safe handling of these tools does more than keep you safe. Handling knives with respect and care helps you maintain them in their original condition for longer. With proper care and maintenance, you can pass them down for generations.
For more safety tips, pocket knife products, and accessories visit William Henry.
Displaying Your Knife: Pocket Knife Display Case Ideas
By William Henry
May 14, 2021
Luxury pocket knives deserve a beautiful and protective home. Consider these sleek display case ideas to showcase your pocket knife collection in your home.
How to Remove and Prevent Rust on a Pocket Knife
By William Henry
May 12, 2021
Removing rust from your trusty blade is easier than ever. From household items to specialty cleaners, you can restore any aged blade to its original glory.

How to Clean and Maintain Your Dirty Pocket Knife
By William Henry
April 26, 2021
Cleaning your pocket knife is a sacrament that allows you to connect with each groove, screw, and blade on an intimate level. Time-consuming? Sure. But it is a critical ritual that keeps your pocket knife as lustrous as the day you first bought it. More than a functional day-to-day tool, pocket knives are heirlooms that can be passed down for generations. Pass along a knife you can be proud to wield and display with proper knife maintenance practices.
Battling the Elements
When you invest in a luxury pocket knife, it is up to you to help maintain its pristine sheen. From opening packages to whittling a work of art, pocket knives are functional and stylish tools that come in handy in a bind. However, everyday use can get your pocket knife dirty. Even just sticking your knife in your pocket can attract lint to its most sensitive components.
If any dirt or debris accumulates in the pivot or locking mechanism, your pocket knives’ function will be severely limited. Any dirt or grime on the pivot can make it harder to open and close the blade. Any debris in the lock can prevent you from keeping your knife locked open or closed. Without proper closure, you increase your risk of injury.
In addition, you must battle the elements which can degrade the individual components of your knife, even its most Hardy and resilient ones made of stainless steel. Prolonged exposure to water, sweat, and high humidity can lead to rust on your blade. Consider the types of materials from your springs, bolts, screws, and locks when cleaning your knife.
It is safe to say, the cards are stacked against you, especially if you do not take the time to learn how to clean a pocket knife. Regular cleaning, maintenance, and lubrication can make sure your tool retains its original form and function.
So, how do you know when your knife needs cleaning? Usually, it will look visibly dirty with dirt, mud, and other gunk on its surface. However, there are instances where you cannot visibly see the debris, but your knife functions poorly. If your knife does not open and close smoothly or it is showing visible signs of rust, it is a good idea to give it a deep clean.
General Cleaning
Cleaning Essentials
Old toothbrush
Cotton swab (q tip)
Toothpick
Lubricant/mineral oil
Dish soap
Water
Paper towel/microfiber cloth
Compressed air (optional)
For everyday cleaning, wipe down your pocket knife with a dry or slightly moist lint-free cloth, paper towel, or rag after every use. Dirt, in particular, should be wiped down immediately after use. If left to dry, mud on the blade or inside the handle can Harden over time and cause scratches and wear on your moving parts.
Safety tip: Wear protective gloves when you are cleaning your pocket knife with the blade open. In addition, wipe the blade with your palm on the spine side to avoid any nicks or cuts.
Serious Cleaning
If your blade is showing a little extra dirt and wear, you can gently remove the debris using an old toothbrush with soft bristles to get into every nook and cranny on your knife. From the engraved patterns to the exquisite inlays and screws, debris is bound to end up in these open crevices. It is up to you to give your folding knife the proper care it deserves.
Scrub away dirt from your locking mechanism, inside the handle, and around the blade pivot. For stubborn dirt that cannot easily be removed, apply a few drops of 3-in-1 oil on your toothbrush, rag, or towel. If you are experiencing trouble opening and closing your locking mechanism, cleaning inside the handle can solve the issue.
It is always best to clean inside the handle when it is dry. Removing lint when wet is basically impossible. Sticking a flat-tip object inside a wet handle can potentially move it deeper into hard-to-reach places and negatively affect the function of your knife.
Pro tip: If your toothbrush cannot clean inside the handle, use a dry q tip, toothpick, or a small and thin paintbrush to wipe away the inner debris. For more high-powered cleaning, use a high-pressure can of compressed air to literally blow away the caked-on debris in hard-to-reach places.
Wash and Rinse
Generally, it is not recommended to let your pocket knife remain wet for extended periods of time. When dealing with extremely hard-to-remove dirt and mud, soap and water may be the only saving grace for your pocket knife’s original sheen.
Keep in mind, you want to thoroughly clean the knife, but you do not want to scrub it so hard that you tarnish its polish. It is a good idea to use a soft bristle toothbrush and the soft side of the sponge when washing your pocket knife with soapy water.
Run the knife under warm water or wash it in a container/bowl with warm water and a mild dish soap solution. Completely submerging the handle in water is safe for most materials, except for wood and a few other sensitive materials. A drop or two of soap is all you need to clean the entire knife.
Pay attention to the locking mechanism, inside the handle, and around the blade pivot. Feel free to use a cotton swab to get deep inside your handle. If a cotton swab is too big to fit in the handle’s small opening, you can flatten the swab’s tip with a hammer or other heavy tool to help it go through.
Safety tip: When washing your knife, the suds may not make the sharp part of your blade visible. If needed, place some tape around the edge of your knife to prevent any cuts, especially when dealing with slippery soap.
Deep Soak
Generally, it is not recommended to get your pocket knife wet, especially for extended periods of time. However, for the practically glued-on gunk, you can completely submerge your pocket knife in a container/bowl of warm water and soap if the blade’s materials can get wet. This is not the case for wood, abalone, mother-of-pearl, or some synthetic materials. Steel and titanium can be soaked in dish soap and water.
Make sure you do not leave your pocket knife in the water for too long and that your water temperatures are significantly below boiling levels. If the residue still will not get off, it is time to bring out the big guns.
Extra Tough
For spots that just will not go away, a little bit of rubbing alcohol on a cotton swab or rag is a good way to clean the caked-on and sticky debris such as tree sap. While alcohol evaporates pretty quickly, it is recommended to immediately rinse your knife after you clean it with rubbing alcohol.
Keep It Together
If you are getting impatient with the dirt and debris stuck inside the handle, do not be tempted to disassemble your knives for a deep clean. Breaking apart your knife usually voids any warranty you may have. If you truly want professional-grade cleaning, get in touch with the pocket knife manufacturer and inquire about their cleaning and maintenance services.
Let It Dry
Leaving your knife wet for extended periods of time can cause excessive wear and rust on your blade. When you wash your knife in soap and water, it is best practice to let your pocket knife dry completely. Do not get impatient and use your knife before every last drop has evaporated from its surface. Any trapped moisture can cause corrosion and affect the opening and closing of your handle, especially if it is made of wood and other sensitive materials.
Lubrication
Once your pocket knife is completely dry, you can apply a thin coat of oil on the blade, pivot, and any moving parts. Avoid getting oil on the handle since it can adhere easily and make it slippery. You can choose from a variety of lubricants available, although most are petroleum-based. Common lubricant choices can also be used on firearms, sewing machines, door hinges, and other moving parts.
Some users have noticed that wet lubricant easily attracts grit, pocket-lint, and hair. If this is the case, dry lubricants, commonly teflon-based, avoid attracting lint. They are available in aerosol cans or grease tubes and dry on your knife’s surface for the ultimate protection. If you will be using your knife for cooking, invest in a food-safe oil. Consider mineral oil or vegetable oil.
How to Oil Your Blade
Most importantly, do not overdo it on the oil. Use considerably less product than you think you may need. If you use more, it may be hard and time-consuming to remove. However, if you use a small amount, you can incrementally add more to your liking. Wet lubricants only require at most a couple of drops. If you have a dry aerosol lubricant, a single light spray is enough.
When oiling your parts, one area to focus on is the pivot. Apply a small bit of lubricant and cycle the blade (open and close) to work it inside. Oil usually has an application device, but you can also use a toothpick to apply it. Some knife users have had good results with using a 1cc medical syringe for precise application.
How Often?
When to oil? The answer to this question varies based on the frequency of use and how often you clean it. Generally, a knife should be oiled after every cleaning. If your knife is in a storage compartment and not being used, oiling it every two to three months should be enough. If you will be placing it in storage for a while, make sure to lubricate it first. Finally, if you are in an area near saltwater or high humidity, it may need more frequent oil application.
Wipe It Down
When you have scrubbed, rinsed, dried, and oiled the blade, give it a final wipe down. A final wipe ensures you have not used too much oil on the blade. You can use paper towels or a soft microfiber cloth to wipe off the excess oil from the blade’s surface. Wiping off any extra oil can reduce the risk of rusting. Even high-quality stainless steel is prone to rust without proper care.
Storage for Longevity
Improper storage practices can negatively affect the look and function of your knives. Many pocket knives come with a snug sheath where you can carry around your blades. However, when you are done using them and return home, it is critical that you give your blades a cursory wipe and store in an open and dry case or drawer. If you leave your knives inside the sheath indoors, it is more likely to attract moisture and lead to rust. Check out our blog resource on how to display your pocket knife.
Rust In Peace
Addressing rust is a whole separate beast. Over time, moisture can develop rust on the blade. But fret not, just because there is a little rust on it does not mean it is completely useless. Rust usually just affects the surface. If you catch it early, it will not do any permanent damage to your blades. However, if you wait to clean the rust, it can cause pitting in the blade, rendering it useless. For a rust-free blade, follow our pro tips on how to remove rust.
Maintain a Sharp Blade
A big part of keeping and maintaining your pocket knives in working order is the sharpening process. Sharpening blades can be done in a variety of ways. Generally, knife sharpeners come in a range of coarse and fine surfaces. Sharpening your own blade can help you connect with your tool but requires a careful hand. If you absolutely do not trust yourself, go with a professional sharpening service to get the job done to avoid damaging your knives. Check out our blog resource on how to sharpen a blade for a detailed rundown of the process.
Upgrade In Style
If your pocket knife is too old and there is no way of resuscitating its original appeal, it may be time to upgrade your tool with a new and improved knife model. William Henry offers heirloom-quality pieces with an edge. Made from exotic and sustainably-sourced materials, each pocket knife appeals to a bolder and more daring side of ourselves.

Knife Sharpening Guide 101: How to Sharpen a Pocket Knife
By William Henry
March 12, 2021
Learning how to sharpen a pocket knife can extend its longevity, as well as retain its function and beauty.
Sharpening a pocket knife is more than a maintenance and care practice, sharpening your knife is an art form that takes patience, experience, and skill to perfect. Once you get the hang of it, it goes from an annoying chore to a labor of love with each purposeful swipe. Using a manual sharpening tool requires fine skill and balance, but mastery is totally achievable with some practice. Electric sharpening tools get your blades sharp at a faster rate thanks to the beauty of technology.
From maintaining a constant angle when sharpening to buying mineral oil lubricant for a sharpening stone, there are a few things to consider on how to sharpen a pocket knife. Our pocket knife sharpening guide breaks down the tools needed, sharpening process, and expert tips to keep your blades sharp.
Gather Your Sharpening Tools
Sharpening tools come in all shapes and sizes. Consider the blade’s material and quality to choose the right type of sharpening tool for your pocket knife. Sharpeners range from electric to manual-operated devices, each with the capacity to hone your blade. Whichever type of tool you choose, there will be a learning curve to achieving a razor-sharp blade.
Electric vs. Manual
High-tech electric sharpeners offer fast and convenient restorations but require an adept hand and super precise angling of the blade. For the uninitiated, the speed of the grinding wheels or belts on an electric sharpener can take off more metal than required, if you are not careful. Manual sharpeners can offer unmatched precision in sharpening, so long as you have mastered the deft movements and sharpening process. At an accessible price, these manual tools are usually compact and portable for small spaces and quick touch-ups on-the-go. There are super cheap tiny handheld sharpeners up to several hundred dollar electric sharpeners, depending on your needs.
Electric Sharpener
Electric sharpeners are quick, relatively user-friendly, and are preferred by people who have many tools to sharpen. Electric options can have features such as pre-programed control guides, nonslip grips, and a retractable power cord. For the electric sharpener, you often slide the knife right in and it does the work for you creating a nice sharp edge. They might be a little loud and can sometimes sound a bit like the pencil sharpeners from elementary school days, those loud grinding metal ones.
Handheld Sharpener
Sometimes you just want to do it yourself. You want to feel the tool and be able to maneuver it ever so slightly rather than rely on something electric to do it for you. You want to master a skill and feel accomplished at the end of the day. There are many handheld knife sharpeners to choose from. Many of them are super affordable, making it a captivating choice for knife sharpening experts and rookies alike. You have to rely on your own strength and force to sharpen the blades.
Knife Sharpener
The knife sharpener is a bit more modern and looks like the tool version of Wolverine’s claw. These are great for sharpening pocket knives or any non-serrated blade. All you have to do is place the side of the blade of your pocket knife in the slot to restore your dull knives. Pull the knife gently through a few times. It often comes with a grip to better hold it, a slip-resistant base to keep it in place with each motion as you slide the blade across.
Sharpening Stone
Rough grit or finer grit on a sharpening stone? The choices are many. Using a sharpening stone is a different handheld way to sharpen your knife blade. Also known as whetstones, the sharpening stone is a popular and quite traditional way to sharpen knives and edges of steel tools. To whet means to sharpen, so a whetstone is a sharpening stone. There are many different kinds of stones to pick from depending on the material, cost, and care needs. There are many sharpening stone materials out there and diamond and ceramic are among the most popular. Some sharpening stones will also need some type of lubricant like mineral oil or water lubricant. Keep in mind that you have to pick a lubricant that does not harden or rot.
Grit
Sharpening stones tend to come with two sides, a rough grit side and a fine grit side. Simply flip the stone to flip the grit. There are multiple grit levels that you can buy in addition to the basics. The stone grit variations are there to help you determine how much to sharpen your pocket knife. You can find course stones less than 1000 grit up to finishing stones at 8000 grit grades. Start off sharpening on the rough grit and then use the finer grit for superfine finishing. Is the edge of the blade particularly dull? Is the knife blade more rough or jagged? Your blade condition can help you determine what grit to use.
Ceramic
You sharpen one side at a time on the side of the stone. Simply switch sides of the blade on the stone to sharpen all edges, then finish off with alternating strokes. The durability of ceramic sharpening stones makes it a popular choice for dull knife sharpening. Cleaning should not be too hard, depending on your brand and the directions. Clean-up can range based on the brand, so it is best to read their exact instructions. The clean-up methods can range from soap and water to a plastic abrasive pad and powdered abrasive cleanser. Some ceramic stones must be used dry, without any oil or water.
Diamond
Much like its ceramic version, you sharpen one side of the blade at a time. Diamond sharpening stones tend to come in Extra Fine, Fine, Coarse, and Extra Coarse grits and bases. Sharpen a dull blade or damaged blade with the extra coarse side of a diamond sharpening stone. If needed, follow up with the extra-fine grit that gives knives and tools a razor-sharp edge. These are a really great way to sharpen your pocket knife, but proper maintenance for your diamond sharpening stone is an important step to making it last.
Tips to Consider
You have acquired your sharpening tools and you are ready to get to work. Now what? You do not want to grind your blade into a tiny nub so these are some fast and easy tips you will not want to miss. We want to help you make your blade the sharpest tool in the shed.
Clean Your Pocket Knife
One of the first steps to sharpening your pocket knife is cleaning it. You want to make sure you take off any debris, gunk, stickiness, or whatever is attached to the precious pocket knives. Start off with soap and water and consult these tips on how to clean your blade.It is impossible to accurately sharpen your knife, gauge the bevel, or correct the sharpening angle if you cannot even see your knife because it is covered in goop from past adventures.
Identify Your Bevel
No matter what you use to make a dull blade sharp, how to sharpen a pocket knife starts with identifying where the knife’s bevel is. The bevel is that slight angle or slight edge that runs across the knife. Usually there is only one bevel, but there are double bevel knife options, so confirm which one you have. Hunting and pocket knife bevel angles range from 22 to 30 degrees normally. Some people like to mark the edge of the bevel with a marker so they can tell if they are hitting the right angle as they hit the blade.
Sharpening Angles
If you watch enough videos on YouTube about how to sharpen a pocket knife, the experts often talk about finding the correct angle. What exactly is it? How do you find it? The constant angle and pressure across the stone or sharpening device allows you to hone at the right angle without having any accidents. Due to the angle, speed, and direction that you are sharpening, a slip may act as a guillotine.
Make sure you are careful during the process because as you are moving back and forth, there is a possibility of severely hurting yourself on a sharp blade edge. You want to ensure that you are sharpening the correct spot to ensure this does not happen. Some knives recommend sharpening at an exact degree angle, whether it is 15 or 20 degrees, other tools are already set at specific angles. You need to sharpen both sides of your pocket knife, so flip to the opposite side and do the process again. Once you reach the tip you might want to lift the knife a little as you sharpen back-and-forth.
Sharpening Frequency
Now that you purchased your equipment and you even have some experience you realize another question pops up. How often should you be sharpening the blade anyway? It will definitely depend on how frequently you use the knife in the first place. If it does not get much use, no need. But, if it feels rough around the edges, it might be time for a sprucing up.
Like any tool, it is all about how you use it. Some sharpeners are legitimately higher quality valued at several hundred dollars. If you do not feel inspired to spend that much to get a sharp knife, there are more affordable options that will do the trick. When in doubt, trust your sharpener’s instructions. Your stone and brand will usually contain instructions on how to clean it, whether you need a lubricant like mineral oil or water, and will walk you through those first steps. Sharpening a pocket knife should not be as difficult as a larger knife but still requires a fair share of elbow grease. Stay sharp!